Step-by-Step Guide to Integrate 7SearchPPC with AdsBridge for S2S Postback Tracking
With postback tracking, you can monitor every KPI and conversion in real time to optimize and scale your campaigns based on accurate data.
Follow this step-by-step documentation to seamlessly integrate 7SearchPPC with AdsBridge for S2S postback tracking.
Step 1: Make Sure you have the Following Things Ready!
For a hassle-free postback integration experience, make sure you have:
- An active AdsBridge Account. If not, sign up now.
- An active 7SearchPPC Advertiser Account. If not, then create your account first.
- Products, Services, and Offers to promote and track.
- An Active Affiliate Account. (*If you’re an affiliate marketer.)
- A dedicated Landing Page. (*If you need one.)
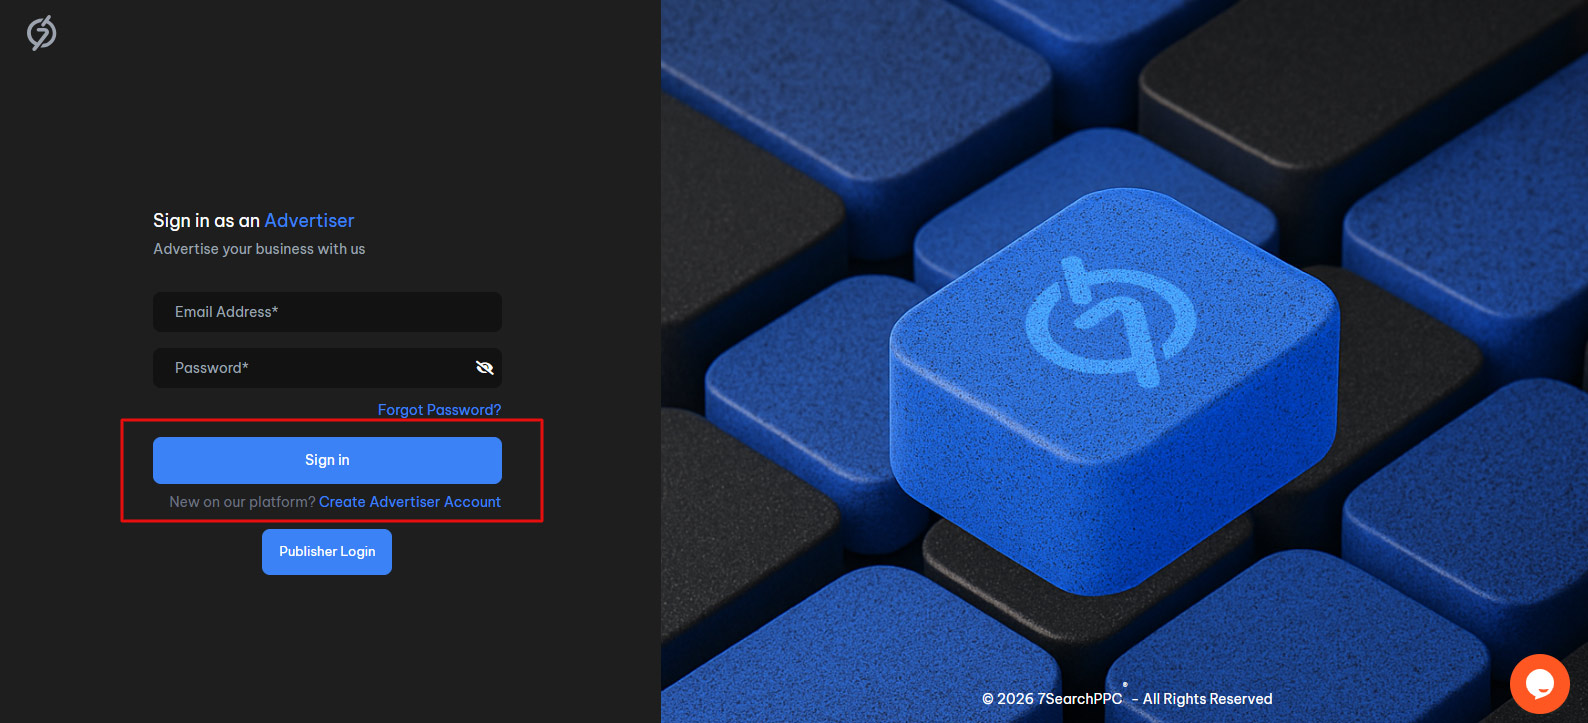
Step 2: Log in to your 7SearchPPC Advertiser Account
If you already have a 7SearchPPC advertiser account, you can log in by using the following steps.
- Navigate to the official website in your browser: www.7searchppc.com
- Click the Log In button located at the top-right corner of the homepage.
- A pop-up will appear on your screen. Here, you need to select the “As an Advertiser” box and click the Continue button.
- Now, Sign In with your credentials to access your advertiser dashboard.
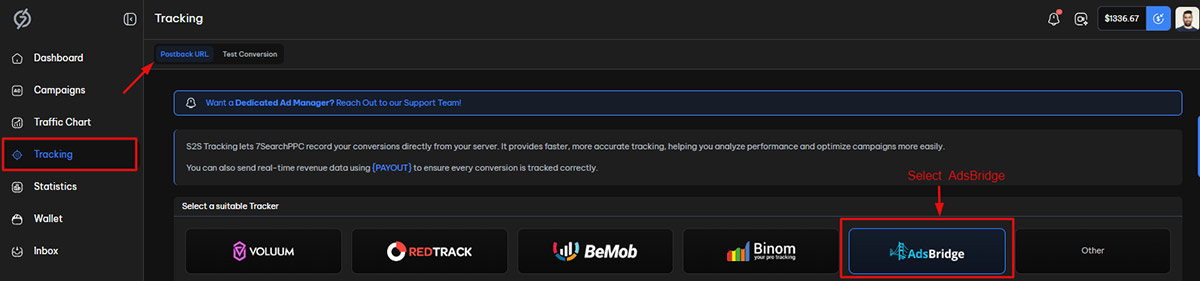
Step 3: Copy the S2S Postback URL From Your Advertiser Account
Once you’ve successfully logged in to your advertiser account, select AdsBridge as your conversion tracking tool, using the following steps.
- Select the Tracking option from the sidebar menu.
- Choose AdsBridge from the list of available trackers.
- Scroll down a little to access and copy the Postback URL.
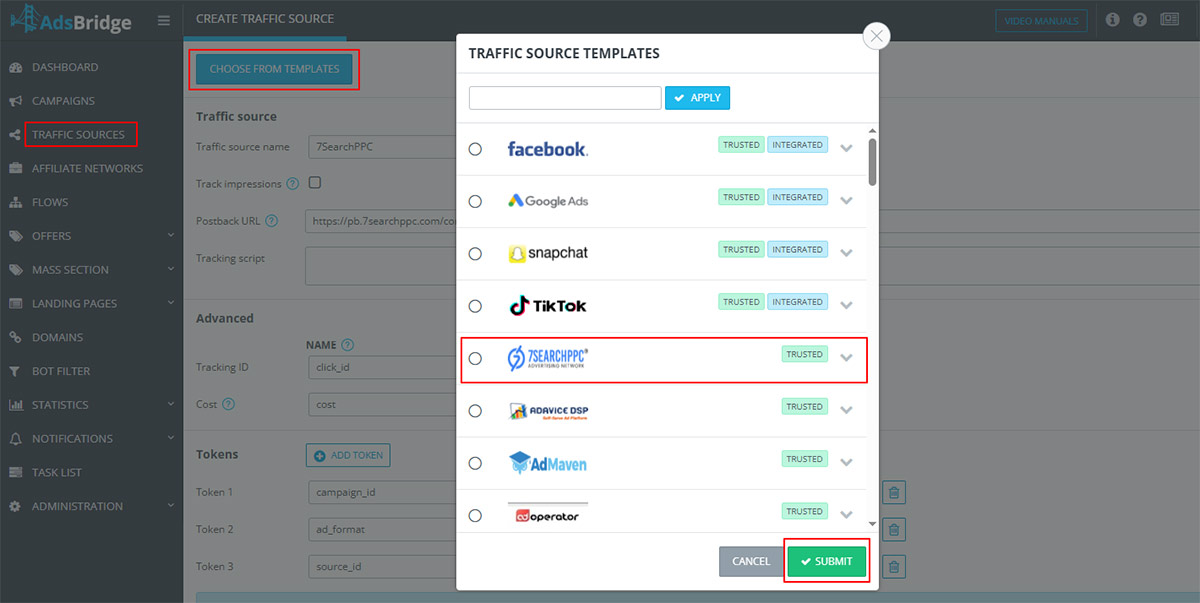
Step 4: Proceed to Integrate 7SearchPPC as Your Traffic Source in AdsBridge
Navigate to your AdsBridge account, log in with your credentials, and follow the steps to set 7SearchPPC as your Traffic Source.
- Select Traffic Sources from the side panel.
- Click the "Create Traffic Source" button.
- Click the "Choose From Templates" button.
- A pop-up will appear displaying all available traffic sources under the Traffic Source Templates section. You can type 7SearchPPC into the search bar and click the apply button to set 7SearchPPC as your traffic source, in case you can’t find it in the dropdown.
- Click the Submit button.
Step 5: Replace the Postback URL to Allow Real-Time Conversion Tracking
Replace the Postback URL with the one you copied from the 7SearchPPC advertiser account, and then click on the Save button.
Step 6: Integrate Your Affiliate Network, Set Up Offers, and Create the Landing Page.
After pasting the postback URL, you need to integrate your affiliate network, add your offers, and set up your landing pages. To do this, you need to:
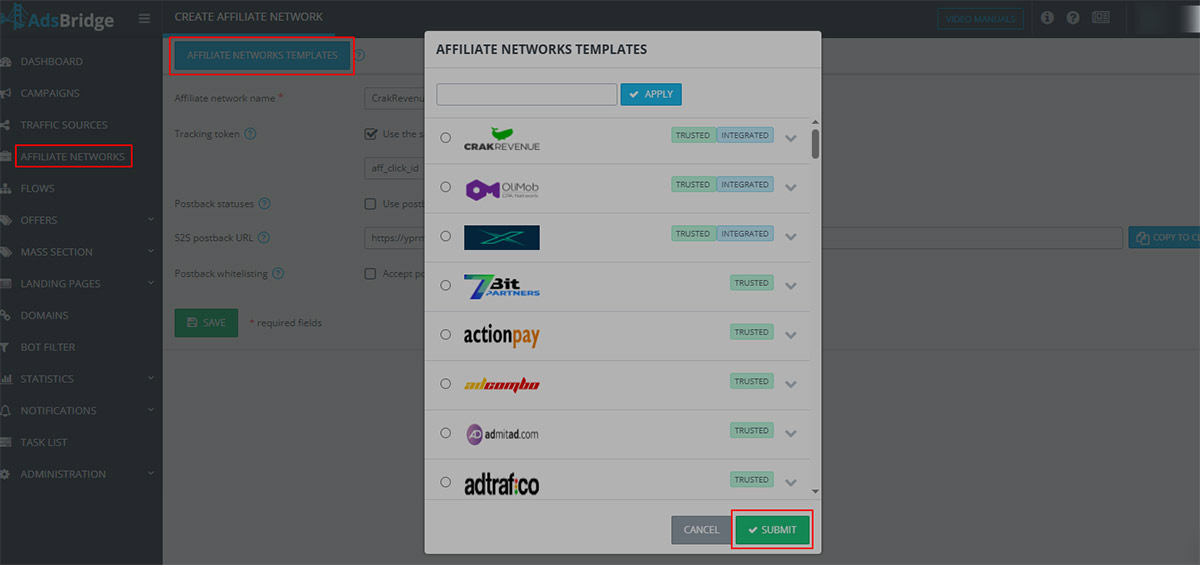
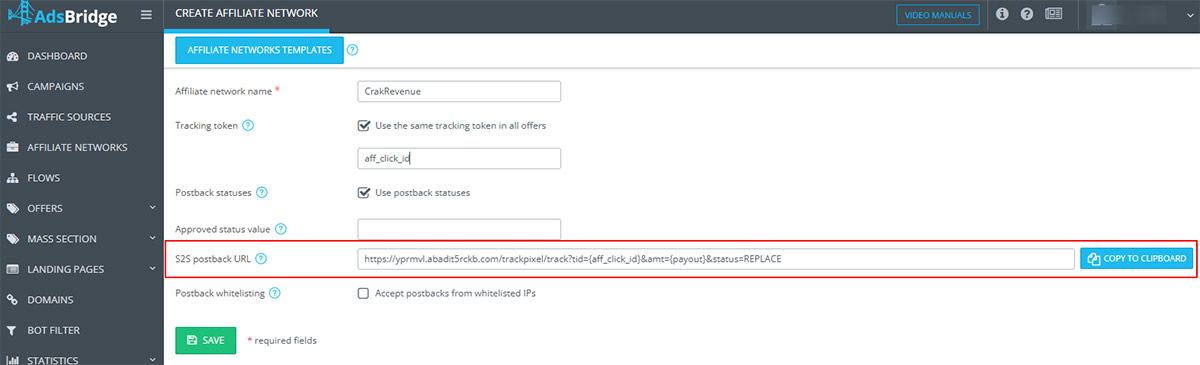
6.1: Select Your Affiliate Network
Integrate your affiliate network using the following steps.
- Select Affiliate Networks from the sidebar menu.
- Click on the Create Affiliate Network button from the dashboard.
- Click on the Affiliate Networks Templates button to select your affiliate network from the list of networks that are displayed on the pop-up.
- Click on the Submit button.
After selecting your affiliate network, copy the S2S postback URL from AdsBridge and paste it into your affiliate network to monitor conversions in real time. We suggest checking the AdsBridge User Guide for a detailed walkthrough on configuring the affiliate network.
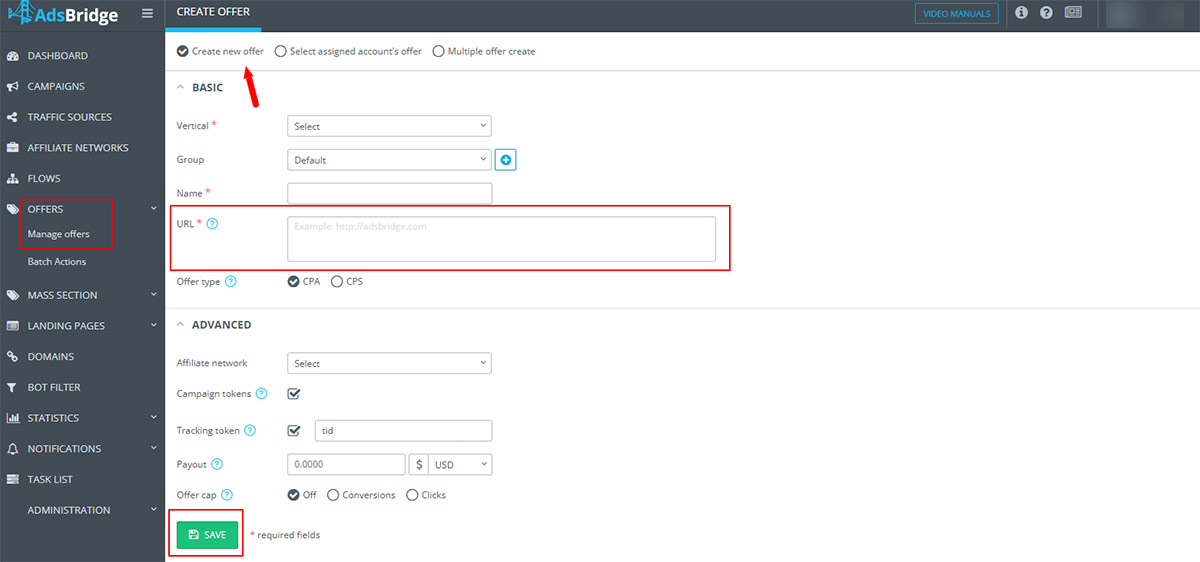
6.2: Add Your Offers
Next, proceed to create your offers in AdsBridge.
- First, select Offers, and then Manage Offers from the side panel.
- Click on the Create Offer button.
- Select Create New Offer option.
- Add the link in the URL field, where you want to redirect users.
- Choose your offer type: CPA or CPS.
- Fill in the remaining details and click the Save button.
For a detailed walkthrough on creating and managing offers, refer to the AdsBridge user guide.
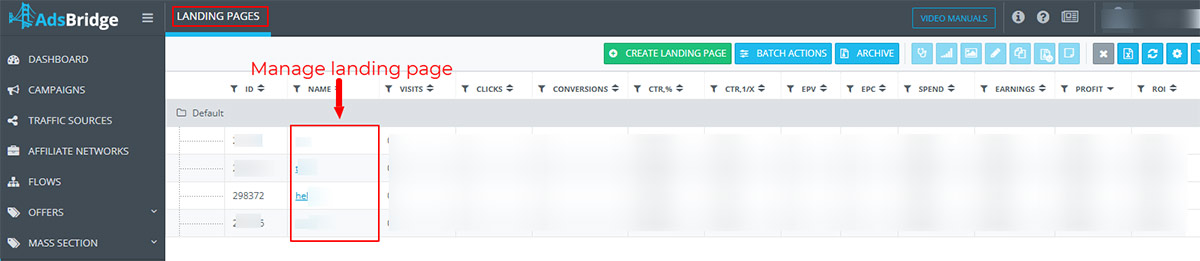
6.3: Set Up Landing Page
AdsBridge offers a range of methods for creating and launching Landing Pages.
- To begin, first select "Landing Pages” and then "Manage Landing Pages" from the side panel.
- Click on the Create Landing Page button.
- Select the type of landing page you want to proceed with.
- Complete all required fields, including landing name, language, vertical, traffic type, etc. Once done, click on the Continue button.
- Preview and Save changes.
You can easily manage and optimize all your landing pages in the Landing Pages section.
If you’ve selected the self-hosted landing page option, you need to either place the Click URL or CTA Code on the CTA button of your landing page to track clicks.
For more details, refer to the step-by-step AdsBridge user guide on creating and editing landing pages.
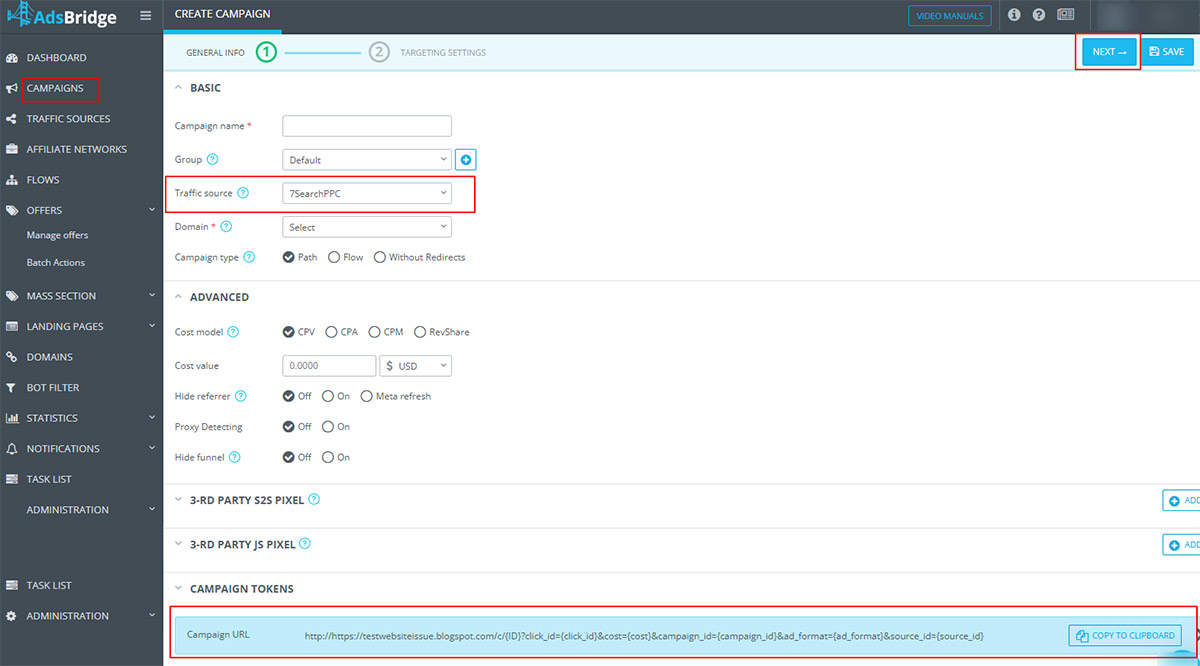
Step 7: Set Up Your Campaign on AdsBridge
Follow the steps to create your advertising campaign on AdsBridge.
- From the vertical navigation, click on the Campaigns button.
- Click on the Create Campaign button from the dashboard.
- Select 7SearchPPC from the dropdown as your Traffic Source.
- Fill out all the required information needed to create the advertising campaign.
- Click Next to save your changes.
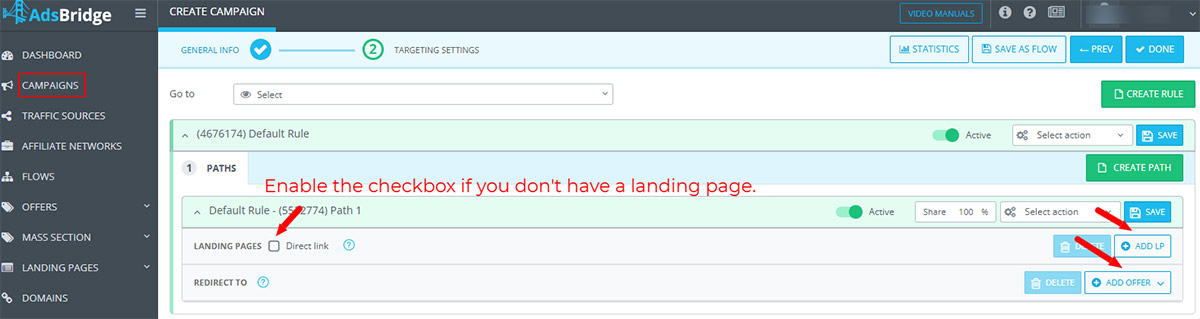
Now, you’ll be redirected to the Targeting Settings page, where you have to set Path and Rules for more precise targeting.
- Set the Path and Rule.
- Path: You specify the traffic path you want your campaign to follow.
- Rule: It filters and routes traffic based on specific criteria, such as country, device, IP address, etc.
- Add the landing pages and offers you created earlier.
- Enable the direct link checkbox if you don't have a specific landing page to promote and want to send users directly to your offers.
You can refer to the user guide to learn how to set rules in AdsBridge.
- Click on the Done button to save your changes.
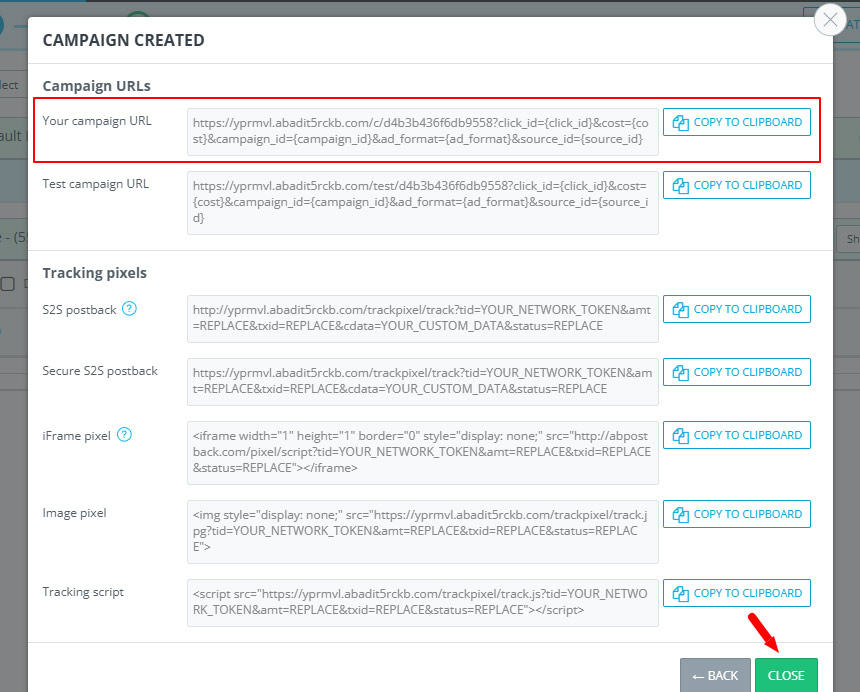
Your campaign has been created. Copy the “Campaign URL” and click the "Close" button.
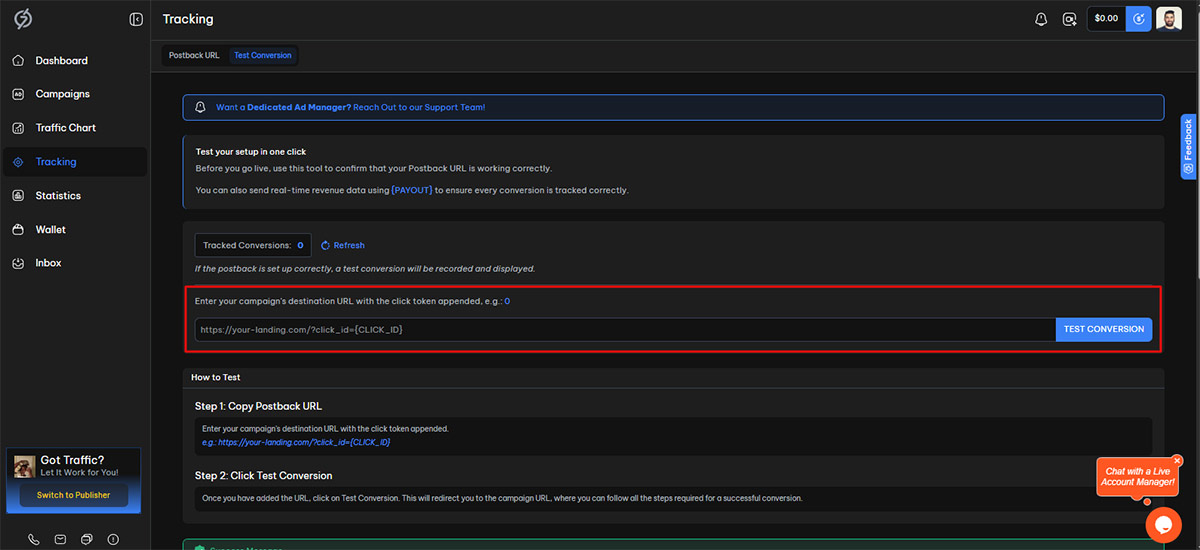
Step 8: Test Your Conversion Tracking Setup
Test your conversion tracking setup to ensure everything is configured correctly.
- Navigate to your 7SearchPPC Advertiser Account.
- Click on Tracking from the side panel.
- Select the Test Conversion tab.
- Paste the Campaign URL you have copied from the AdsBridge dashboard.
- Click on the Test Conversion button to start the test.
- You will now be redirected to the conversion page. Complete the required action, such as submitting a form or signing up.
- Confirm that the conversion is being tracked in your dashboard.
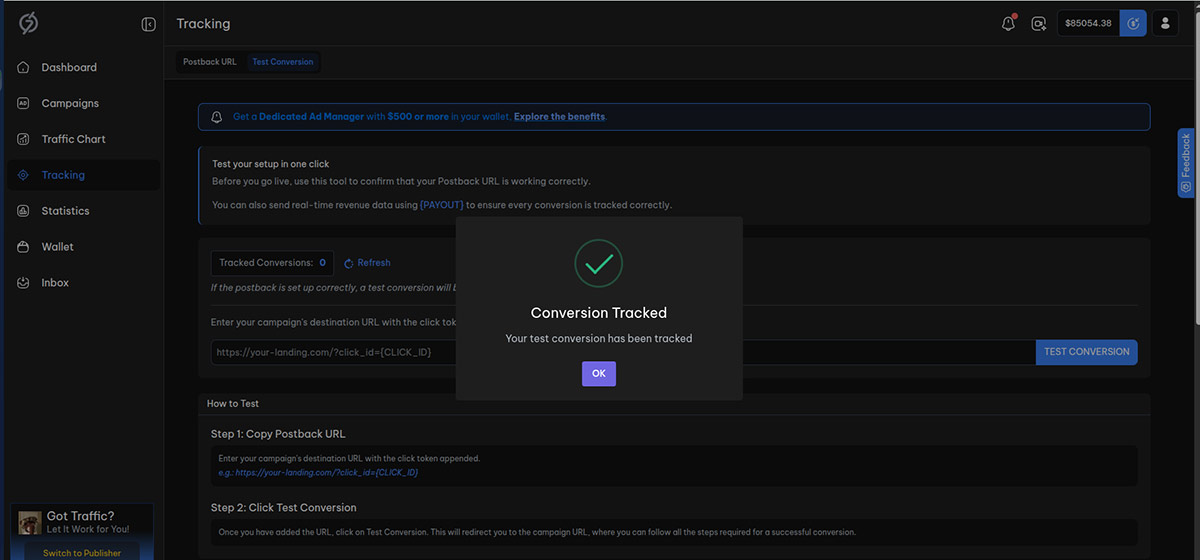
If the postback is configured correctly, a test conversion will be recorded and shown on the Test Conversion Tab. Sometimes it takes a little longer to respond. Wait 2–3 minutes, then refresh the page to check if the conversion has been recorded.
Step 9: Create and Launch Your Campaign on 7SearchPPC
Once the conversion is recorded, proceed to create your ad campaign in 7SearchPPC using the steps mentioned below:
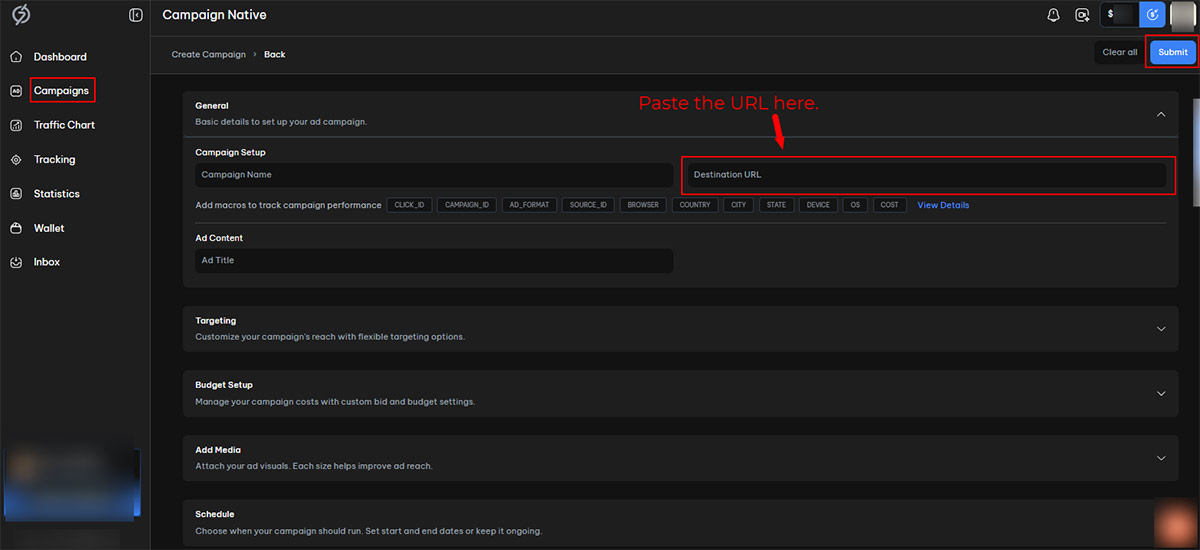
- From the vertical navigational panel, click on the Campaigns option.
- Click the Create button located in the top-right corner of the dashboard.
- Select an Ad Format of your choice, and then click the Start button located in the bottom-right corner to begin the campaign creation process.
- Paste the URL you’ve copied from the AdsBridge dashboard in the Destination URL field, and complete all the necessary details, including campaign name, targeting, budget preference, etc.
- After reviewing, click on the Submit button to get your campaign approved.
Benefits of Integrating 7SearchPPC with AdsBridge
Integration of 7SearchPPC with the AdsBridge tracking platform offers several benefits. Some of them are listed below.
- Perform In-Depth Analyses: Advertisers can track KPIs beyond clicks, impressions, and CTR in real time, allowing them to analyze their campaigns in depth and make more data-driven decisions.
- Save Budget: Advertisers can monitor underperforming campaigns and choose whether to pause or kill them. This way, they can save more and invest only in high-performing campaigns to increase their ROAS.
- Full Control and Transparency: Advertisers can monitor and track every single action taken on their campaign through a user-friendly interface.
- Minimizes Manual Work: This integration helps simplify tracking by instantly sending conversion data, reducing manual tasks, improving accuracy, and enabling faster, data-driven campaign optimization decisions.


 Log in to Manage Your Account